AWS lambda function is an agile way to implement serverless API endpoint; It is also quite easy to spin up some python models as long as the model is
not very complex.
1. Try adding existing AWS layers to see if it satisfies your needs
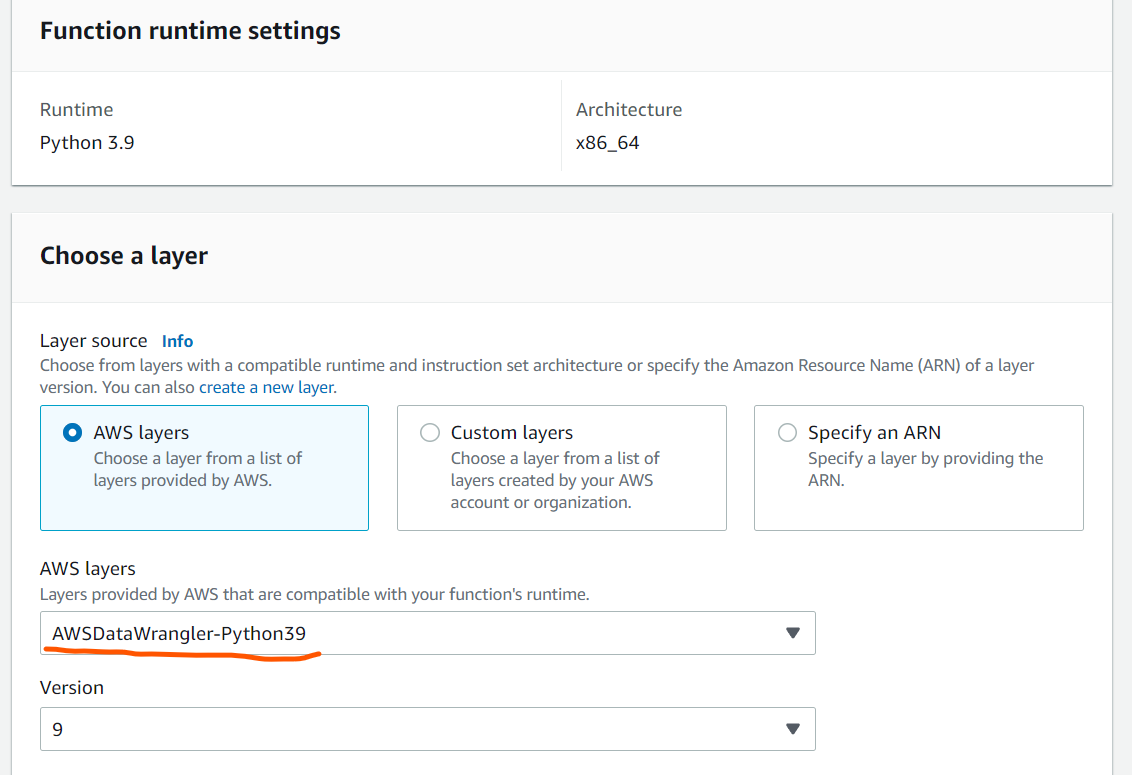
To include some very common pythons packages, such as pandas, numpy and requests,
you can add the aws layer called “AWSDataWranger”.
The following screen shows how to add it after you create the lambda function, here we are using the python3.9 environment.
Most of the time, we may want to more custom python packages to be installed, so we have to create a custom layer to have those packages specifically installed.
Notice that, there is a 250M size limit for each layer, so this means we usually can only install one or two packages in each layer. And those packages cann’t
be too large.
The easiest way to create a custom layer and ship it to AWS, such that you can choose to add it in your lambda fuctions, is by using The AWS Command Line Interface (AWS CLI).
2. Install AWS CLI
AWS CLI provides direct access to the Amazon Web Services public API. So it’s likely you already have aws cli set up.
If not, you can follow the offical instructions to install it on different platforms.
Here we take the Unbuntu linux as an example.
There are couples of ways to install AWS CLI, one way is to install AWS CLI is by using pip:
Step 1: Install pip (on Ubuntu OS), if you don’t have it already
$ sudo apt install python3-pip
Step 2: Install CLI
$ pip install awscli –upgrade –user
Step 3: Check installation
$ aws –version
Step 4: Configure AWS CLI to link your own credentials
$ aws configure
As a result of the above command, the AWS CLI will prompt you for four pieces of information.
The first two are your AWS Access Key ID and AWS Secret Access Key, which serve as your account credentials.
The passkey ID and a secret passkey ID can be created from AWS Management Console.
For the region name, it is something like us-west-2 in this example.
We also need to write our default output format. We can choose between the default value, in which case we will only have to press Enter.
Or we can also select the JSON format (JavaScript Object Notation), in which case we’ll type json and hit Enter.
The AWS CLI configuration is stored in ~ /.aws / config and ~ /.aws / credentials, as you can see in the following screenshot.
3. Create a virtual python environment
Taking python 3.9 as an example, we first need to install the latest version of Python 3.9 and the development libraries:
sudo apt update |
Now we can create a Python 3.9 virtual environment called sandbox or any name you like using the following command.
python3.9 -m venv sandbox |
and activate the virtual environment:
source sandbox/bin/activate |
Now we have the sandbox virtual environment turned on, we are ready to install python packages that we want to use in lambda functions.
4. Install python packages and zip it and upload to AWS
Here we take installing openai package as an example, with the sandbox virtual environment, we install it using pip:
pip install openai |
after the openai is successfully installed in the sandbox virtual environment, we deactivate and environment by typing:
deactivate |
Now, we make a new folder called ‘python’, copy the sandbox virtual environment packages into this directory, and then zip it:
mkdir python |
Now, we should be able to use the aws cli command to upload the zip file as a custom layer with name “openai” like this:
aws lambda publish-layer-version --layer-name openai --zip-file fileb://openai_layer.zip --compatible-runtimes python3.9 |
Notice that, “fileb://“ is necessary to make it work in the above command.
with successful upload, the command will output info about relevant messages telling your layer name and version.
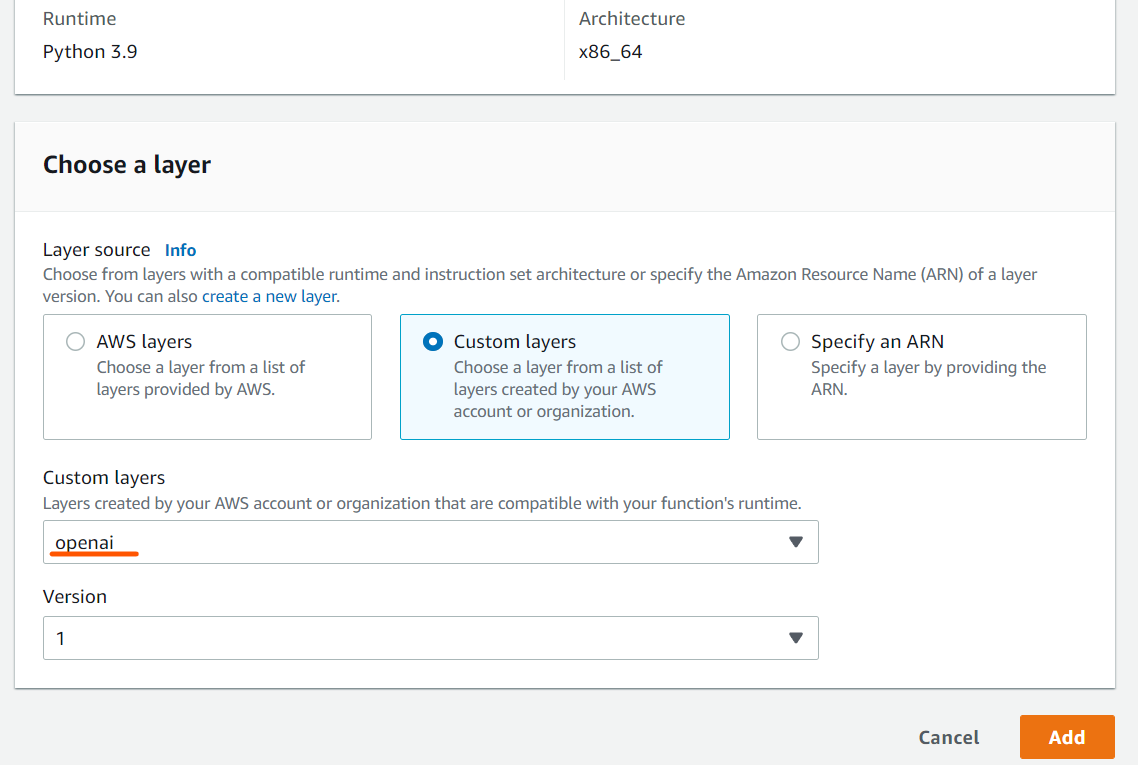
5. Choose the custom layer for lambda function
If we go back the layer adding part of the lambda function, after refreshing, we should be able to see the custom layer called openai and its version at 1.
Just choose it and add it. Now we are ready to import it in the code!